

How to Set Up your Files for Print
Look at that beautiful photo, maybe it’s a sunset, maybe it’s those cute kids or puppies, maybe you and your loved ones, maybe it’s that single perfect flower. It’s there on your screen. You took twenty minutes getting the right shot, then another twenty minutes going through the five hundred images of it to find just the right one, then another fifteen minutes editing out that trash can in the background and smoothing the tiny imperfections. Now, what you have been waiting for, PRINT! Ah yes, you’re thinking, I can make this into cards to give to friends and family! or I can hang this masterpiece on my wall! or, for some, I am going to sell this in an art exhibit!
WHAT IS THAT?!!!! What happened to my beautiful crimson?! That is clearly vermillion! Why are there millions of dots?! The horror!
Ah yes, we’ve all been here. But my friends, I am going to share with you a few tips to make sure you print out the flawless, beautiful rainbow colors of your dreams!
At your desk it is helpful to have a list of the following questions to ask yourself before sending to print.
- Are all of my images and color settings in correct format?
- Is the resolution of my files and pictures set up at 300ppi?
- Do any images and colors go right up to the end of the page, and if so, did I export my file with bleeds?
- Did I export my file correctly so that I have a package containing all fonts, images, links and native files pertaining to the project?
- Did I export a final printable PDF version of my project as well?
Remember, while it is important to follow all these steps to ensure the quickest service, here at Park Press Printers, our experts will double check everything and help you every step of the way.
Now, let’s go into more detail:
- Are all of my images and color settings in the correct format?
Full Color Printing:
Let me explain color format as simply as possible.
Color formats are combinations of colors, which mix together to get all the other colors. We have all learned the primary colors are Red, Yellow, and Blue. That is generally true, especially when working with mediums such as paint. However, to view images on computer screens, or in print, it changes. For computer screen and print, there are two basic formats. The one we use to view images on computer screens is called RGB, and the one we use to view images in print is called, CMYK.
The format you see on your computer screen is called “RGB” because the three basic colors which make up this format are Red, Green, and Blue.
The format you use for print is called CMYK because the four basic colors which make up this format are Cyan, Magenta, Yellow, and Black (we don’t use the letter B because that would be confused with Blue so we use the last letter of the word, Black, K)
So how do you know if your files are in CMYK?
There are a number of ways to check.
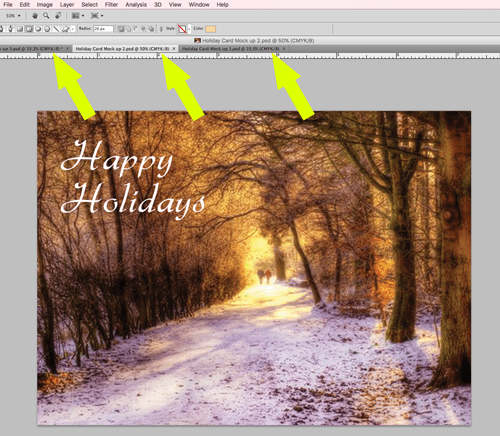
The best way would be to check all your images before you output your file. Every image has a “color space”, and you want your color space to be CMYK. In Photoshop, simply look at the top of the image window, and it will tell you if the file is in CMYK or RGB, as pictured below.
To change this in Photoshop: go to Image > Mode > CMYK Color
To change this in Illustrator: go to File > Document Color Mode > CMYK Color
If your file has already been exported as a PDF, you can still change the color by following these steps:
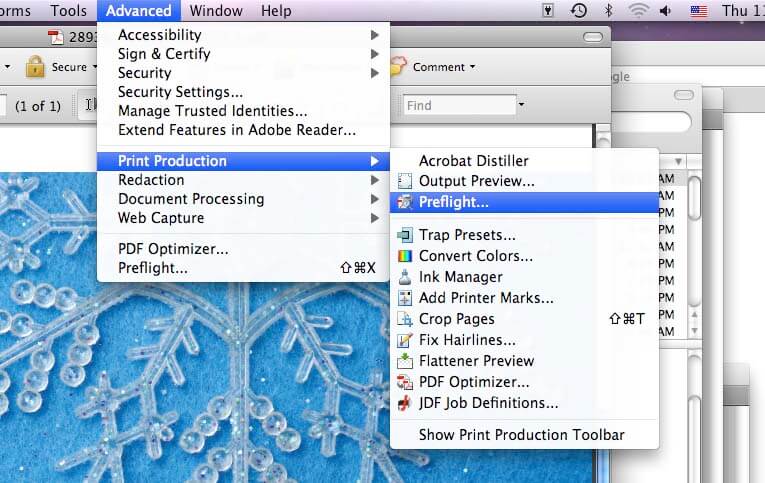
- Open your PDF in Adobe Acrobat,
Go to Advanced > Print Production > Preflight. - Once in the preflight window, go to the under the “Preflight” tab and choose “Sheet fed Offset (CMYK)”
Click “Analyze”.
*This will give you all the information you need to see if your file is good to print including color and resolution.
1 and 2 Color Spot Printing:
Spot Color:
While CMYK is how a computer automates color for print, Spot color is created by a press person manually mixing a color. A popular place you may find spot colors are with corporate logos. Certain brands may use specific colors that cannot be made by CMYK. In order to print Spot Color, you need to set your colors to the format called PMS (Pantone Matching System) colors.
To do this in Illustrator, follow these steps:
- Go to Window > Swatches
- Click in the top right hand corner of your swatches panel,
- Click on “swatches library” on the drop down menu
- Go to “Color Book”
- Here you will see a whole list of Pantone Colors with their PMS numbers.
- When you go to print you will want to supply us with the PMS numbers.
Blacks:
Another thing to note when looking at color is your black. The color black or K should be at 100%, with no C M or Y contained within, especially in your text or logos. In images, the darkest black should be as close to 100% black as possible in order to get a sharp image.
- Is the resolution of my files and pictures set up at 300ppi?
Images on screen are displayed as pixels (Pixels per inch, or PPI) and printed as tiny dots on paper (dots per inch, or DPI).
To get a crisp, clean image when printed, you want all your images to be 300 ppi or more. If you have an image that is completely necessary to use but is not at least 300 ppi, expect a lower quality print.
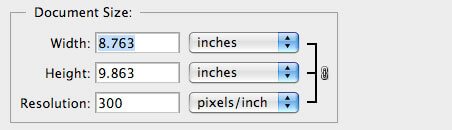
Once again, there are a number of ways to check this. In Photoshop, you can go into your image and go to Image > Image Size. This window will tell you what your PPI is. Also, in most layout programs such as InDesign, there is an Info window you can open that gives the specifications of each picture you have selected.
After you export as a PDF, you can also preflight it as mentioned before in the last step and see if you have any resolution issues.
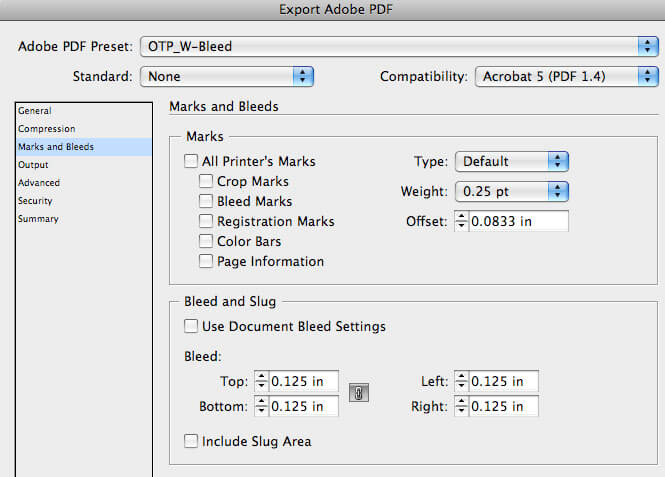
- Do any images and colors go right up to the end of the page, and if so, did I export my file with bleeds?
Bleeds? Are they talking about paper cuts???
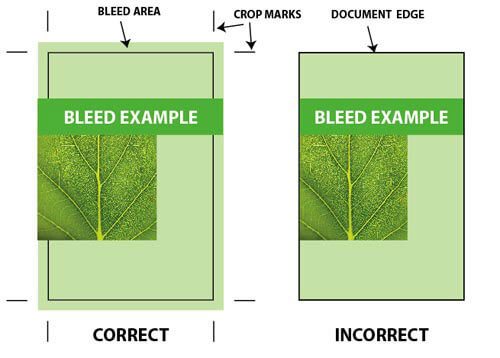
Ha, funny word, but all it means is, images or colors, in a design, which go all the way to the corner of the page. In order to create a bleed, pictures and colors should go past or bleed over the edge of the design at least 1/8 of an inch, and then be exported with .125 inch bleeds on export. This is to provide some room when the final printed product is cut so you don’t get any ugly whiteness around your edges.
- Did I export my file correctly so that I have a package containing all fonts, images, links and native files pertaining to the project I am creating?
Many print jobs will not need this, as it is usually only necessary if you need us to edit anything in the file.
When you layout a design in programs such as InDesign or Quark, you are compiling many different elements all into one file (pictures, fonts, etc.). These elements need to be collected and packaged together in order to be utilized or manipulated on another computer. This is different from a PDF in the sense that a PDF makes a file with all these elements embedded into the actual file and cannot be edited further.
To package: first make a destination folder where you will save everything.
Then, open the file and go to: File > Package.. or.. File > Collect For Output …or… File > Output, depending on the program you are using.
- Did I export a print-ready PDF version of my project?
The PDF version of your project is the file that will be printed.
This file cannot be edited without taking special steps, so when this file is set up, it should be a finished version of your design. Usually, this is all we request when you upload a file to us, but if you need us to go into your file and make edits, refer to step 4.
Exporting your file is as easy as going into your native file, and going to File > Export.
There, you will be given a number of options, but all you need to worry about is if you have bleeds or not (refer to step 3) and what version of Acrobat the PDF will be compatible with (Choose Acrobat 5, PDF 1.4 or lower).
CONGRATULATIONS!
You’re done!
You can either, upload your PDF in our Upload Section, E-Mail it to us by use of our Contact Form, or simply put it on a disk and bring it into our office by hand.
And don’t be discouraged if you are unclear on or cannot complete all of these steps yourself- we are here to help your images be as pure and vibrant as you imagined them to be!